Open the Workflow tab
Inside a campaign, open the Workflow tab. A sequence is just the chain of emails and the waits between them. You can view it two ways, toggled at the top:
- Steps (a clean, numbered vertical list. Best for building and reading the sequence.
- Canvas) the same flow as a visual graph with branches. Best for conditions and advanced routing.
Your choice is remembered between visits. Start in Steps view.
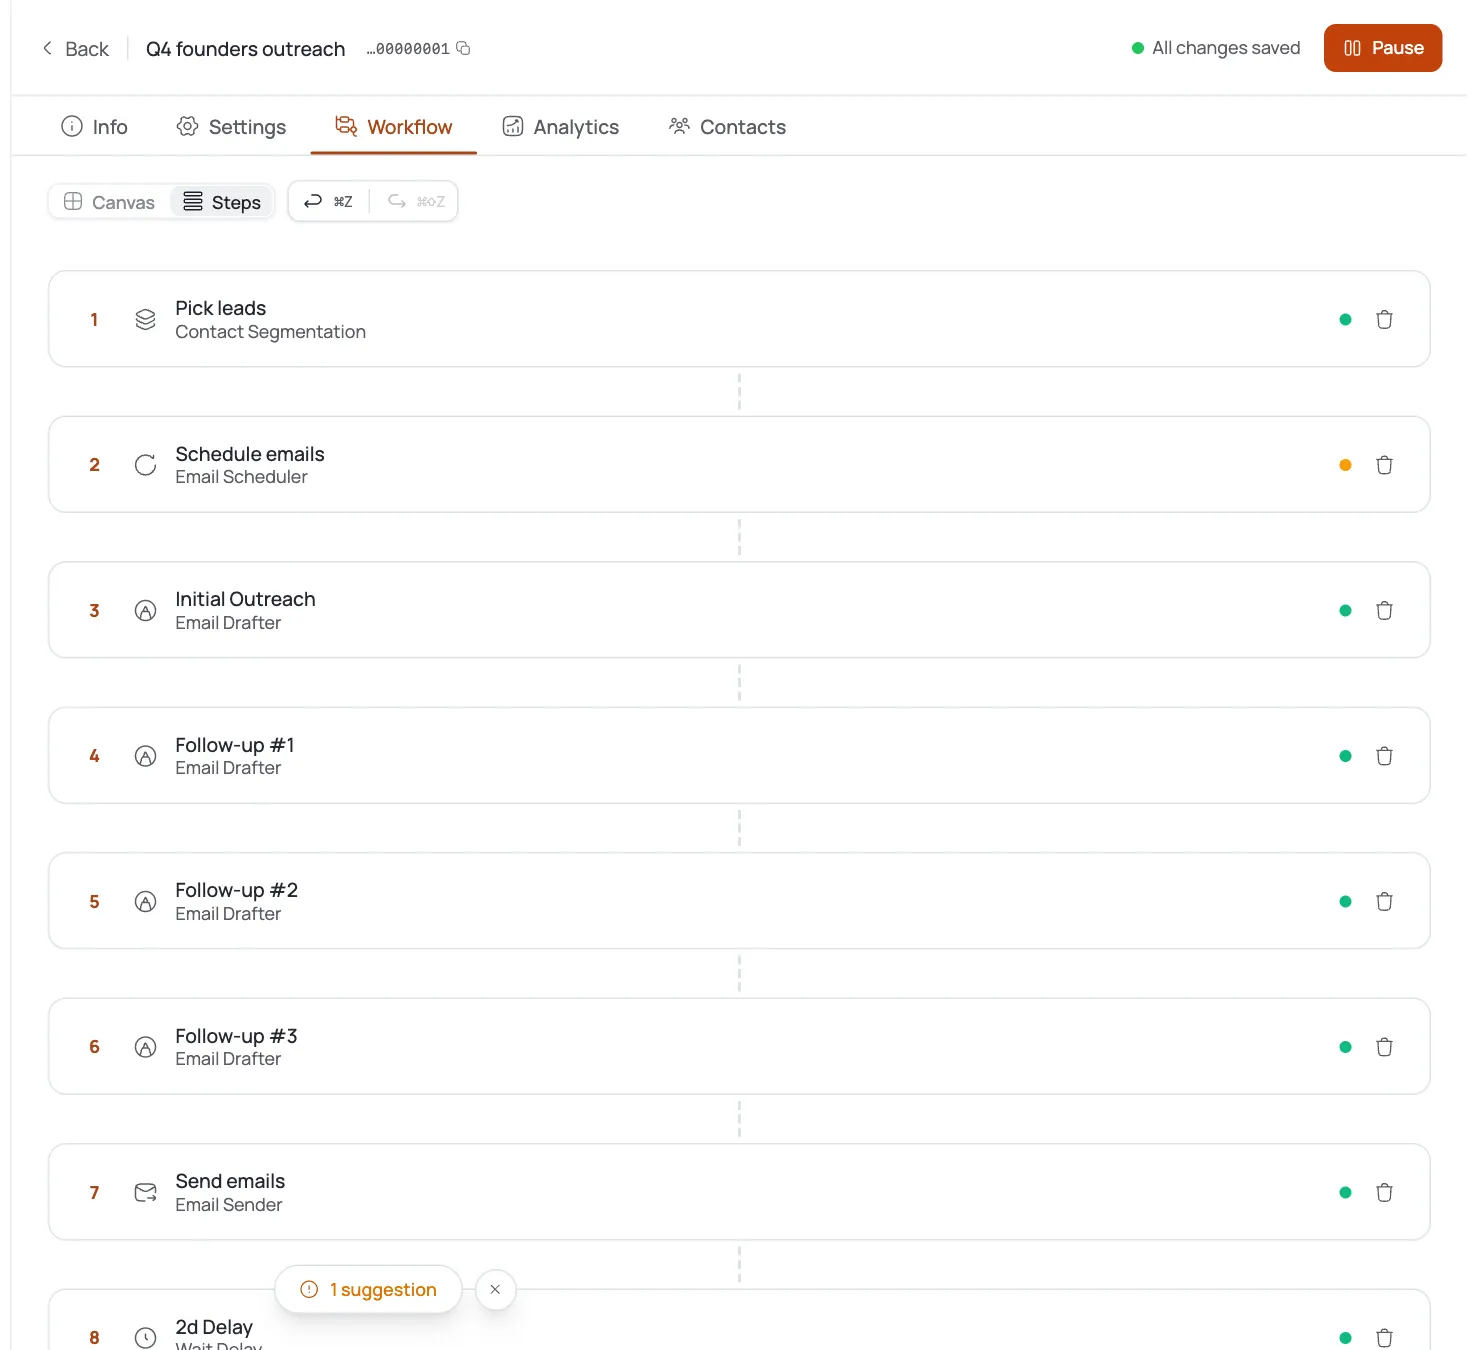
Understand the default sequence
A new Template campaign scaffolds a four-email sequence out of the box, so you're editing rather than starting from a blank canvas:
- Initial Outreach (sends immediately (delay 0 days).
- Follow-up #1) 2 days after the previous step.
- Follow-up #2 (2 days later.
- Follow-up #3) 2 days later.
Each email is an Email Drafter step; a Wait/Delay sits between them. The first email is labeled Initial Outreach and every later one Follow-up #N automatically.
Set the delay between steps
The gap before a step runs lives on the Wait/Delay node between emails. Open it and set Delay (days) ("Number of days to wait before the next step runs." It accepts 1 to 365 days.
There's no wait before the first email, so Initial Outreach always goes out at send time. Space follow-ups a few days apart) 2–3 days is a good default. Too tight reads as pestering; too wide loses the thread.
Write each email in Email Templates
Open a drafter step's Email Templates editor to write the actual email. Each has a Subject Line and Email Body. Personalize with merge tags from the Insert merge tag toolbar: e.g.
{{company_name}}, plus always-available{{sender_name}}and{{sender_company}}.- Keep the first email short and specific; keep follow-ups even shorter.
- Use Send Test to email yourself a rendered copy before you rely on it.
The step's position label (Initial Outreach / Follow-up #N) tells you where in the sequence you're writing.
Add A/B variants (optional)
Within a single step you can add more than one template as an A/B variant using Add A/B variant. The campaign rotates variants so you can compare subject lines or angles, and the Per-Step Breakdown in Analytics later shows which variant won on open and reply rate.
Change one thing at a time (usually the subject) so the test result is readable.
Add, reorder, or remove steps
In Steps view, Add Step opens a picker of step types (Contact Harvester, Contact Segmentation, Email Scheduler, Email Drafter. Add an Email Drafter to extend the sequence, and adjust the Wait/Delay before it to set its timing.
Need branching) "only follow up if they didn't reply"? Switch to Canvas view and add a Condition node, which splits the flow into true/false paths.
Reuse a proven sequence from the library
Rather than writing from scratch, open the sequence library (Browse library) and import a ready-made multi-step sequence. On import you can edit each step's Subject, Body, and Delay before step, and a cadence timeline shows the schedule as Day 0, +2d, and so on.
Imported steps drop straight into the same drafter-and-wait structure, so you can keep tuning them afterward.
Pro tips
Delay lives on the Wait node, not the template
Timing between emails is set on the Wait/Delay node's 'Delay (days)' field: not inside the email editor. If a follow-up fires too soon or too late, that's the node to open.
The first email never waits
There's no delay before Initial Outreach: it sends at campaign send time. Delays only sit between follow-ups, so 'Day 0' is your first touch.
A/B test one variable
Add an A/B variant that changes only the subject line, then read the Per-Step Breakdown for the winner. Changing subject and body at once makes the result impossible to attribute.
Start from the library, then edit
Importing a library sequence gives you a proven cadence and structure in one click. Rewrite the copy for your offer, but keep the timing until your own data says otherwise.
Frequently asked questions
How many emails are in a sequence by default?
A new Template campaign starts with four: Initial Outreach (sends immediately) plus Follow-up #1, #2, and #3, each two days after the previous step. You can add, remove, or re-time any of them.
In what unit is the delay between steps?
Days. Each Wait/Delay node has a Delay (days) field ('Number of days to wait before the next step runs'), accepting 1 to 365 days.
Where do I set the wait between two emails?
On the Wait/Delay node that sits between them, not in the email editor. Open the node and change Delay (days). There is no wait before the first email.
How do I personalize the emails?
Use merge tags from the Insert merge tag toolbar in the template editor: for example {{company_name}}, plus the always-available {{sender_name}} and {{sender_company}}. They're filled per contact at send time.
Can I A/B test within a step?
Yes. Add an A/B variant template to a step and the campaign rotates variants. The Per-Step Breakdown in Analytics then shows which variant performed best on open and reply rate.
How do I add a step or a condition?
In Steps view, Add Step lets you add another Email Drafter (or Harvester/Segmentation/Scheduler). For branching like 'skip if replied', switch to Canvas view and add a Condition node with true/false paths.
What's the difference between Steps and Canvas view?
They're two views of the same sequence. Steps is a numbered list that's easiest to build and read; Canvas is a visual graph that exposes branches and conditions. Your last-used view is remembered.
Can I reuse a sequence across campaigns?
Yes: open the sequence library, import a ready-made sequence, and edit each step's subject, body, and delay on the way in. A cadence timeline (Day 0, +2d, …) shows the schedule before you commit.